May Day Gift Cones … DIY Project

by Trenda

“Dear old world … You are very lovely, And I am glad to be alive in you.”   ~ from Anne of Green Gables

white blossoms and steeple

It’s May!  The darling month when everything seems possible.  Look at this sweet description of May Day from The Old Farmer’s Almanac established in 1792.

“With winter’s retreat, colts and calves kick up their heels and frisk over fresh grass, seedlings seek the sun, and birds call for mates….And we humans join their revels for one day: during spring’s “May Day” festival, even serious-minded folk put work aside to enjoy Nature’s exuberance!”

May1.jpg

Still quoting The Farmer’s Almanac … “Here are some joyful May Day traditions marking the return of spring and the renewed gift of life.

  1. Neighbors may leave baskets of flowers on each other’s doorsteps or doorknobs.
  2. Kids can go barefoot on May Day for the first time.
  3. People will crown a “May Queen” for the day’s festivities.
  4. Beekeepers will move bees on May 1st.
  5. Fishermen expect to catch fish on May Day.
  6. On May Day morning, if a maiden gathers dew before sunup and sprinkles her face with it, she will enjoy luck and youthful beauty for the rest of the year.
  7. Farmers often plant corn, cucumbers, and turnips on this day.
  8. Villagers may hold theatrical battles between “summer” and “winter” that banish the winter.
  9. The Kentucky Derby starts off the month of May (the first Saturday of the month).
  10. On May 1st, people in Britain welcome spring by “Bringing in the May,” or gathering cuttings of flowering trees for their homes.
  11. May 1st in Hawaii is called “Lei Day,” and people will receive prizes this day for wearing the prettiest handmade leis.”

May2

Hanging May Day baskets is an enchanting custom that is fun to incorporate into your own family traditions.  Sweet paper cones made from stock card paper with scalloped edges and ribbons are easy to make and are a delightful surprise to find. 

brother sister

  Supplies Needed:

  • stock card paper (double sided paper if you want a pattern on the inside and outside of your May Day cone)
  • scissors
  • scalloped edged scissors
  • ribbon
  • shredded paper or tissue paper
  • craft glue 
  • florist vials, if using fresh flowers
  • candy, flowers, little gifts, etc.


Instructions:

  1. Cut stock card paper into a 7-inch square (I used double-sided stock paper to have prints on both the outside and inside of my May Day gift cones
  2. Use decorative scissors to cut scallops around the top edge of the square
  3. Place pencil tip at the bottom of the paper and begin rolling paper around pencil tip to form cone
  4. Secure outer flap of cone with glue 
  5. Punch holes along scalloped edge approximately 1″ apart, beginning at the top front center
  6. Thread a 22″ – 24″ length of 1/2″ ribbon through the holes
  7. Tie ribbon into bow in the front … leaving a 6″ loop at the back of the cone for hanging
  8. If using fresh flowers, use florist vials and fill with water and flower stems  to tuck into the cone, or fill with shredded paper or tissue paper and fill cone with silk flowers,candy, little gifts, etc.

instructions

What a lovely surprise to find hanging on your door … a May Day gift cone filled with silk flowers, a package of “Ferrero Rocher, fine hazlenut chocolates” and Unicorn Sparkle Nail Polish. (:

May Day Basket 2

 This sweet little May Day cone is filled with silk flowers, a tube of lipstick, and a small bottle of perfume.

May Day basket 1

Hope your May Day is filled with lots of sunshine and happy surprises!

From my cottage to yours May Day

From my cottage to yours ~ Trenda

dogwood scripture

Thank you for reading my blog!  To have all my posts delivered to your email address, just click FOLLOW in my post above … or click on my site:  cottagegreenonthelake.com

FOLLOW ME on PINTEREST!

Trenda@cottagegreenonthelake.com

cropped-cropped-img_0452-e1510254818805.png

This week I’m joining:

 Chloe Crabtree with Celebrate & Decorate


Hello June! … Delicious BBQ Beans & DIY Place Cards for Father’s Day

~ Trenda

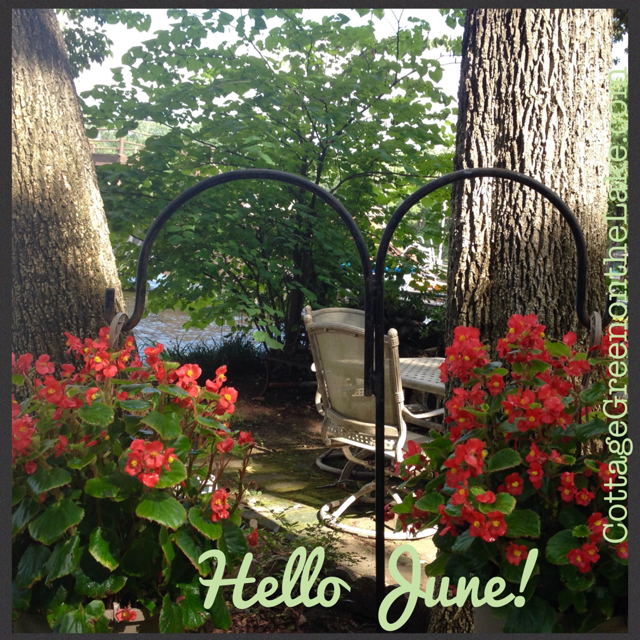
Hello June!  We’ve been looking forward to seeing you! (:

hello June!.png

“Roll out those lazy, hazy, crazy days of summer …” It’s time to slow down, kick back, and relax!

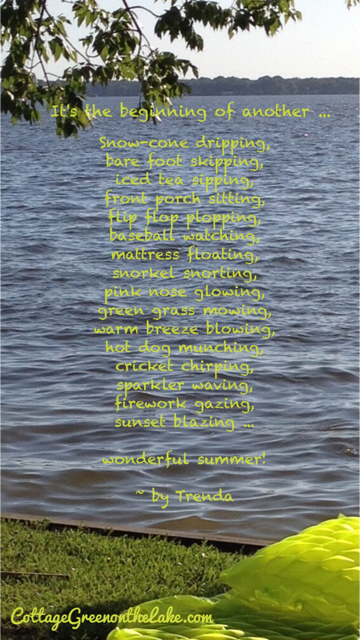
 WONDERFUL SUMMER!  ~ by Trenda

“It’s the beginning of another …

Snow-cone dripping,

bare foot skipping, 

iced tea sipping,

front porch sitting, 

flip flop plopping,

baseball watching,

mattress floating,

snorkel snorting,

pink nose glowing, 

green grass mowing,

warm breeze blowing,

hot dog munching,

cricket chirping,

sparkler waving,

firework gazing,

sunset blazing …

 wonderful summer!” 

final Wonderful Summer! .png

The days of June are marked off the calendar with the “procession” of different celebrations and “happenings.”  Flag Day – June 14th … Father’s Day – June 18th … and the longest day of the year, Summer Solstice – June 21st.  Keep the “red, white, and blue” decorations handy and get out those summer recipes and “Father’s Favorites!”  Two of our favorite’s here at Cottage Green are … my recipe for Delicious BBQ Beans and Sand Pail Ice Cream

bbq beans cover

We love the smoky flavor of these “Delicious BBQ Beans” and the enhanced layer of flavor that the bell pepper adds!  I also love that the beans are cooking in the crock pot while I’m away or I’m busy preparing other dishes.

BBQ beans.JPG

Now, for some elegant DIY place cards that are easy to make that will add an “air” of sophistication to your “Father’s Day” table.  If you’ve been following my blog for any length of time, you know I love “dressing” the table!  One of the easiest ways to make your table festive and make every guest feel important is by adding place cards to your tablescape.  I made these simple, but elegant place cards for a graduation party and they are perfect and serving “double-duty” … for our Father’s Day celebration!

welcome fatehr's day placecards.png

Here are supplies needed to make these place cards:

supplies.png

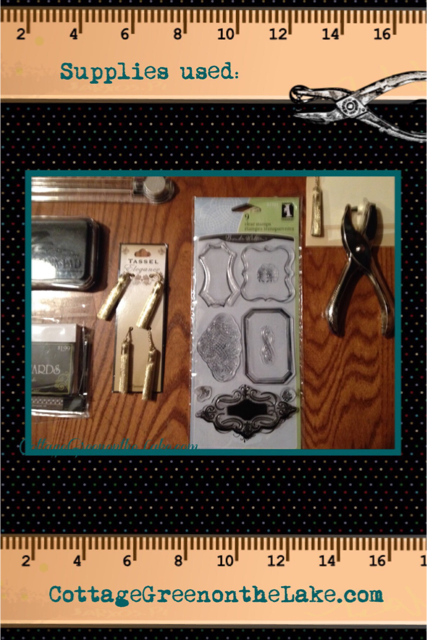
I bought my miniature decorative tassels in the “Notions” section at Hobby Lobby (where the fabrics/buttons/ribbons are located).  I also bought my place cards and my clear stamp pads at Hobby Lobby, in the stationery section.

place cards.png Instructions:

  1. Punch a hole in upper left-hand corner of each place card, making sure you punch the hole through the front and back of the place card.
  2. Insert the opposite end of the tassel through the punched hole in the front of the card (insert, front to back) so that the tassel is in the front of the place card.
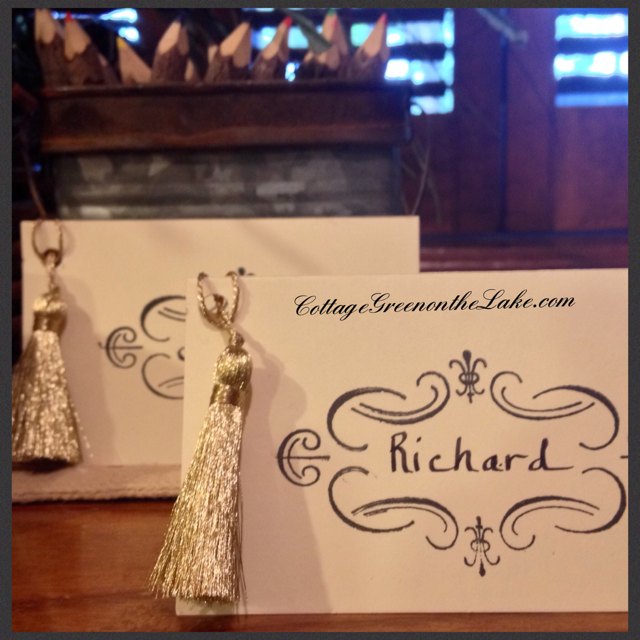
  3. Bring the looped end of cord over the top of the place card and insert (thread) the tassel through the corded opening and pull gently to secure the “tassel in place.  Make sure the knot is not taut, so the tassel drapes loosely down the front of the place card. * (see photo below)
  4. Stamp the front of each place card with a filigree frame of your choice from your selection of clear stamp pads.  Make sure you allow enough time for the ink to dry before handling.
  5. After ink has thoroughly dried, write each person’s name centered in the stamped frame.

*Close-up photo of #3 instructions:closeup tying

I love the elegant and “man-ly” look of these place cards and can’t wait to show you how they look “gracing” our Father’s Day tablescape!

closeup placecards.png

Now hang up your hammock, get out the ice cream maker, and drape your patio in party lights and “Roll out those lazy, hazy, crazy days of summer … you’ll wish that summer could always be here.” ~ Nat King Cole

scripture.png

From my cottage to yours ~ Trenda

cottage-green

I’m delighted that you read my blog today!  Please click on FOLLOW in the post above or on my site cottagegreenonthelake.com to have all posts delivered directly to your email address.


%d bloggers like this: