It’s almost Halloween, and this week I’m getting ready for our family’s traditional chili fest…always a fun, pumpkin filled evening with lots to eat, and festive treats. Our dinner menu for this special evening is always the same…steamy bowls filled with Chili con Carne served alongside a topping bar, a large salad, and a crockpot filled with delicious Pumpkin Spice Latte. No tricks are allowed, but it’s, “all about the treats” for the grandchildren. There will be Candy Corn Sugar Cookies and Harvest Moon Pies. For the adults, there’s cheesecake covered in a caramel and toffee drizzle, and for toasting, later, there’s Ghost Peep S’mores…all treats worthy of a night reserved for goosebumps and thrills.

I would rather sit on a pumpkin and have it all to myself, than be crowded on a velvet cushion.”
Henry David Thoreau
In preparation, I’m making a cute, “not so spooky” Halloween wreath. (: I have several ways of making wreaths, (click here to see) … (here) … and (here) but I particularly like this method whenever I make a wreath that has a lot of different textured materials and ribbons.

Materials needed:
- Wire wreath form
- Mesh ribbon in assorted colors
- Satin ribbon in assorted colors and width
- Wire pipe cleaners (I choose pipe cleaners to match the colors I’m using in my wreath)
- Wire cutters
- Scissors
- seasonal signs, and/or decorations to add to wreath
- Hot glue gun and glue sticks
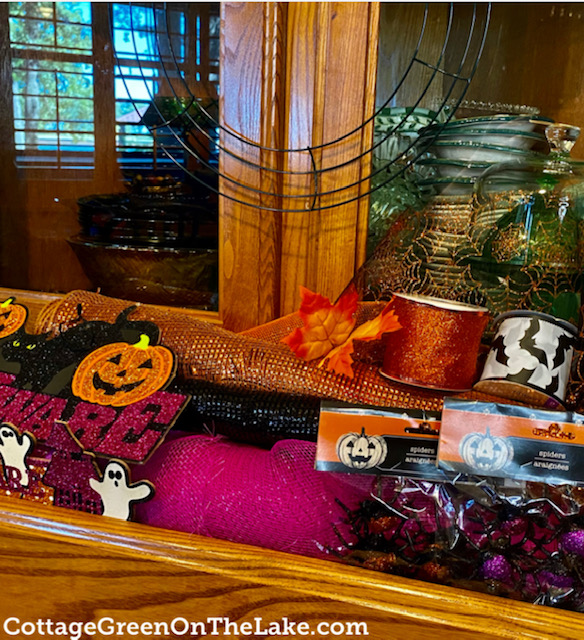
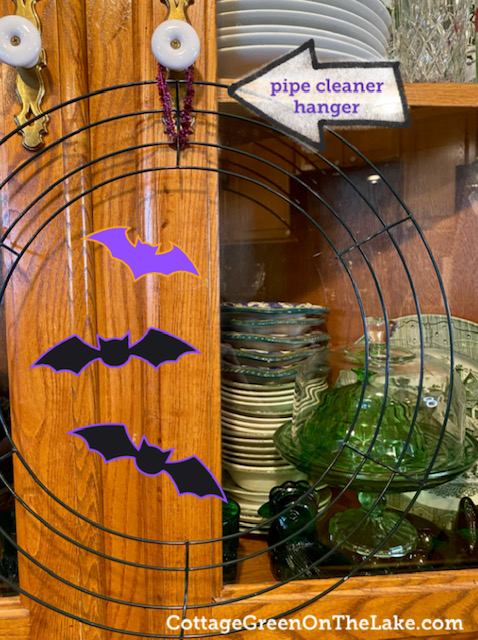
Look at my handy wreath making station! (: All the supplies and materials I need to make a wreath fit neatly inside the opened drawer of our china hutch. The first step in wreath making is to attach a pipe cleaner to the back of the wire form. Twist the ends of the pipe cleaner together to make a hanger for your wreath.
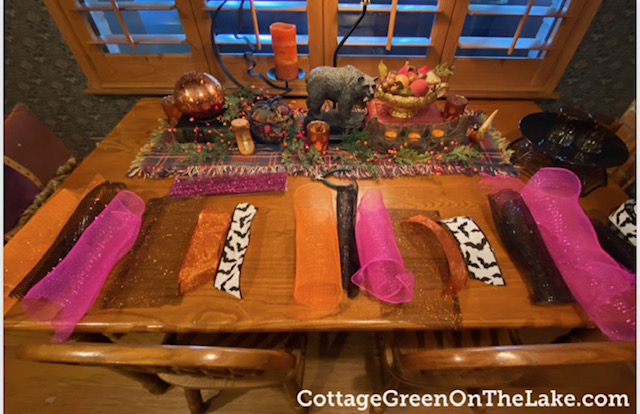
Choose the mesh, ribbons, tinsel, raffia, etc. that you want in your wreath and cut these materials into 8″ strips. Place the cuts strips down on a table, assembly-line fashion. Place your widest mesh/ribbons first…one strip from each of the colors you have chosen for your wreath.
Begin forming your “bows” for the wreath by taking one strip of each of your colors in your assembly line, beginning with the widest ribbon. If you are using mesh ribbon, don’t try to straighten out the mesh, just leave the cut strips of mesh in their cylinder shape. Take a strip of each color ribbon and grasp it in the center, between your thumb and fingers. As you continue to gather the rest of the ribbons in your color sequence, place some of the strips of ribbon at different angles to form a large “bow cluster.”

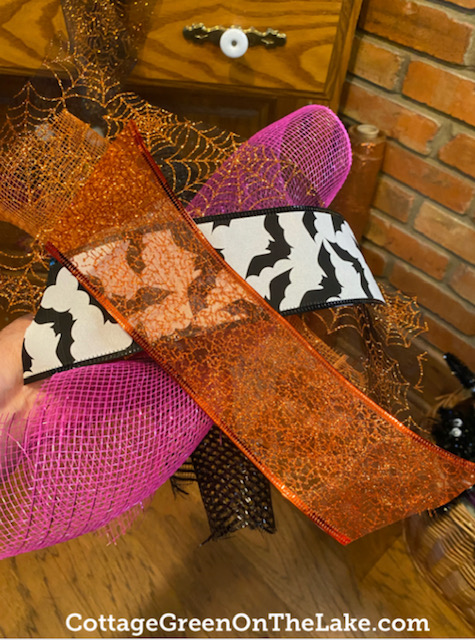
Continue gathering up your strips until you are have 1 strip in every color in your hand. Wrap these strips together with a pipe cleaner to form your first bow cluster. I had 7 different ribbons I used in making my wreath…an orange mesh, black mesh, hot pink mesh, spider web ribbon, orange gossamer ribbon, white satin ribbon covered with black bats, and…I also added a black and orange tinsel that is not in this picture. Each of my bow clusters consisted of 7 different strips of mesh, ribbon, and tinsel.
Grasp and hold all of the ribbons together and thread a pipe cleaner on either side of the center of the ribbons you are grasping. On the underneath side of the ribbons, twist the pipe cleaner around the center several times to bind all the ribbons together to form a bow cluster.

Fluff, tug, and pull on your ribbons to shape your “bow.” Then attach the bow cluster to the wire form of your wreath, using the tails of your pipe cleaner to secure the bow. Trim off the excess pipe cleaner.

Continue gathering ribbon strips, making bow clusters, and attaching them to the wreath form. To make a fuller wreath, I attach each of my bow clusters at different angles on the form, and stagger the placement of each cluster by using alternate wires around the circumference of the wreath.

Continue making bow clusters and filling in your wreath form until your wreath form is covered.
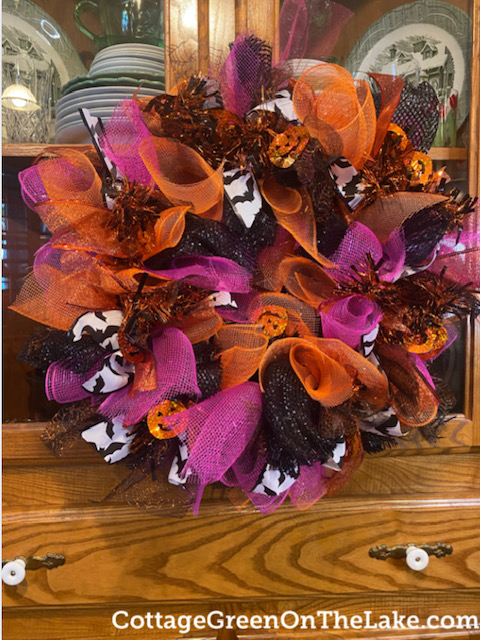
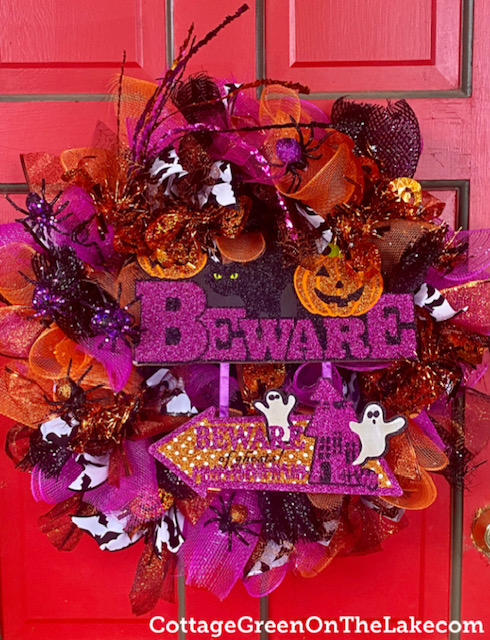
When you have completed adding all your bow clusters and your wreath is fluffy and full…add your final decorations. Tie on any “heavy” decorations (like the wooden sign I put on my wreath) using pipe cleaners to attach your decoration to your wreath form. For smaller decorations (like my glittery spiders) use your hot glue gun.
Whew! (: I know this is a lot of instructions, but this wreath is really easy to make and comes together quickly. Read through my directions once or twice, looking at all the pictures and I think you’ll be ready to make a different wreath for every season!

I’d love to hear from you! Please leave any questions or comments you have in the comment section below. If you would like to read each new post I write and have it delivered directly to your email address, just click FOLLOW in my post above and follow the prompts.
PLUS…
Follow me on Pinterest: Trenda@cottagegreenonthelake.com
on Twitter: Trenda@4theseasons
on Instagram: cottagegreenonthelake.com
Discover more from Cottage Green on the Lake
Subscribe to get the latest posts sent to your email.


Another “over the top” memory making time for your family. You all are in for a wonderful fun filled weekend. I don’t know how you find the time or the energy to do all this. Matthew 5:16 was one of my mother’s favorite verses.
LikeLiked by 1 person
Hahaha…dear Sherry,
Getting everything ready takes longer then it once did…for sure!
Matthew 5:16 is one of my favorite scriptures, also.
Now, I love knowing it was one of your mother’s favorites, as well. ❤️
I thought when I added the little jack-o-lantern picture with this verse, it was a great visual reminder of how our light can penetrate darkness.🎃
😘 Trenda
LikeLike