
Setting a pretty tablescape after the Christmas decorations are put away can be challenging, but with 2 very special birthday celebrations this month, I wanted the table to glow and set about creating an enchanting woodland tablescape that would be fitting, “In the Bleak Midwinter.”
Continue reading “Winter Celebrations and Tablescape”Tag: decor

Thanksgiving Tablescape…Tips for Styling & Setting a Stunning Tablescape
“Let gratitude be the pillow upon which you kneel to say your nightly prayer.” Maya Angelou
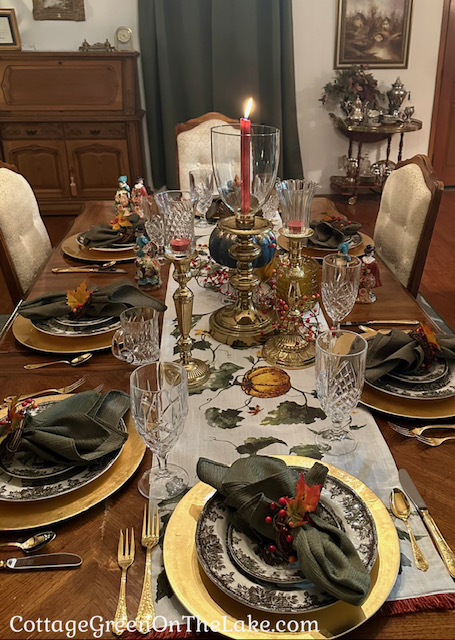
Yesterday was a very special day in The United States of America…a holiday aptly named “Thanksgiving.” Thanksgiving is celebrated every year in America on the fourth Thursday in November. It’s the day we set aside to thank the Lord for all He has blessed us with and brought us through in the past year…a grand day celebrated with feasting, family, and friends!
Today, I’m going to show you how I decorated our Thanksgiving table and give you some tips that will help you style your own table beautifully for any occasion.
Continue reading “Thanksgiving Tablescape…Tips for Styling & Setting a Stunning Tablescape”Share this:

Setting a Cozy Winter Tablescape and Decorating the Mantle
Our kitchen nook glowed invitingly, with winter weather just a windowpane away…

Setting a cozy winter tablescape and decorating a mantle that brims with rustic charm and elegance is easy using a cozy plaid, a fir swag, and a variety of different sized candlesticks, silver pieces, and crystal.
Continue reading “Setting a Cozy Winter Tablescape and Decorating the Mantle”Share this:

How Far is it to Bethlehem?Christmas Decor and Manger Scene

While we were living in Germany, we had the unforgettable experience of visiting the medieval city of Rothenburg ob der Tauber in the area of Bavaria in Germany. It was almost Christmas and while Richard and I were walking down the cobbled streets, fluffy snowflakes began to fall. It was enchanting!
Continue reading “How Far is it to Bethlehem?Christmas Decor and Manger Scene”Share this:

Create a Magical Christmas Tablescape
…Lighting the long, gold tapers that match the golden chains of the reindeer’s harness adds the last bit of enchantment to this sugar-plum scene.
Christmas magic abounds in this fun and simple tablescape with Santa and his reindeer prancing across the table.

Now, Dasher! Now, Dancer! Now, Prancer and Vixen!Continue reading “Create a Magical Christmas Tablescape”
On, Comet! On, Cupid! On, Donder and Blitzen!
~Clement C. Moore
Share this:

Creating an Outdoor Centerpiece for Thanksgiving
Today was another beautiful November day and the perfect day for assembling a centerpiece for our outside table. The centerpiece splays across the table and is made up of “twig-ery and poke-ery” and other autumn finery, and candlelight twinkles over the tabletop. An outside dining area easily becomes an extension of your living area and an enchanting way to beckon company outside.
Continue reading “Creating an Outdoor Centerpiece for Thanksgiving”Share this:

DIY Halloween Banner – Quick & Easy Craft
I love the nostalgic and rustic appeal of this Halloween banner. It’s so easy to make, the only hard part will be deciding where to hang it.

Continue reading “DIY Halloween Banner – Quick & Easy Craft”“Trick or treat, bag of sweetsA, ghosts are walking down the street.”
Author unknown
Share this:

A Tablescape and Spring Buffet Plus, Decorating Tips for your Home
“See! The winter is past; the rains are over and gone. Flowers appear on the earth; the season of singing has come, the cooing of doves is heard in our land.” Song of Solomon 2:11-12
Brilliant blue skies, birds in construction mode flying back and forth with building materials in their beaks, Mourning Doves cooing, Barn Swallows swooping, Mockingbird’s singing, beautiful wisteria, azaleas, and roses blooming in all shades of pretty…it’s Spring!
Continue reading “A Tablescape and Spring Buffet Plus, Decorating Tips for your Home”“Adopt the pace of nature: her secret is patience.”
Ralph Waldo Emerson
Share this:

Christmas in the Greenhouse
A white lace table runner against the rugged-y table was striking on the potting table that usually held potting soil, terra cotta planters, and trowels…and Buttered Almond Cookies tucked inside an antique sugar bowl and Gingerbread Thins looked especially festive in a cut glass, pedestaled bowl for our Christmas Tea.

I hope you had a wonderful season of Christmas! Some years ago, Richard and I decided we were going to celebrate the whole month of December and truly relish each part of the season: the beautiful decorations, the holiday music, the tastes and seasonal treats, the divine Christmas-y smells of evergreens, cinnamon, sugar cookies, orange pomanders, and gingerbread…and most important, amidst and amongst it all, we would reflect and ponder each day on God’s gift to us…Jesus.
Continue reading “Christmas in the Greenhouse”Share this:

Cottage Laundry Room Renovation and Easter Giveaway Winners Announced………by Trenda
In the laundry room’s transformation from ugly duckling to beautiful swan, Richard covered the walls with tongue and groove, beaded board that he painted a deep sage green to match the walls in the hallway.

Today I am excited to show you our renovation of the smallest room here at Cottage Green on the Lake, the cottage laundry room! Richard transformed this work horse room into such a cute little place, I inwardly sigh with contentment when I open the door.
Continue reading “Cottage Laundry Room Renovation and Easter Giveaway Winners Announced………by Trenda”
