“What a playhouse is to a child, a potting shed is to a gardener”
~ Unknown
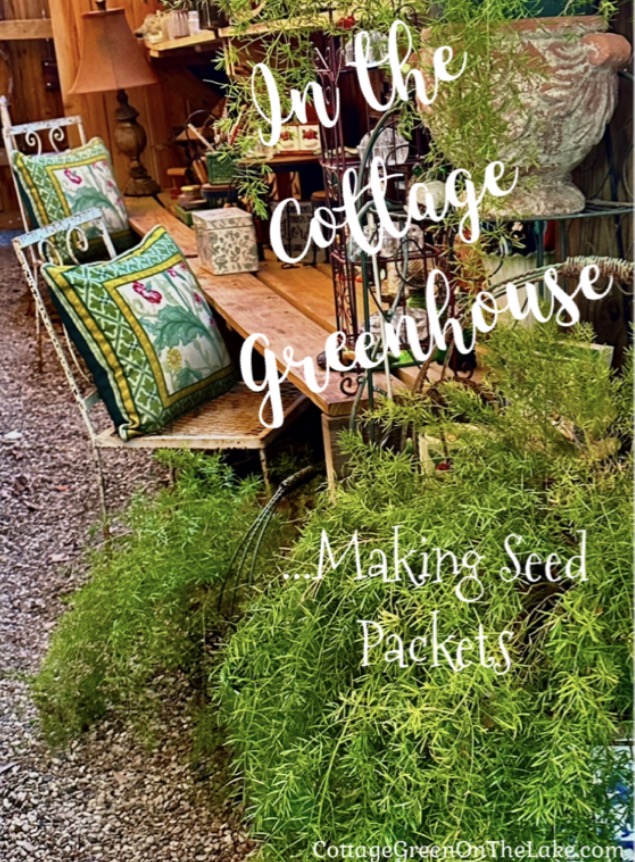
After days of colder-than-normal temperatures, the sunshine beckoned and it seemed like a good day to “go outside and play”…in the greenhouse. It was still chilly outside, but the temperature in the Cottage Greenhouse was 72 degrees…and a perfect day for dreaming of Spring flowers.
One must maintain a little bit of summer, even in the middle of winter.” ~ Henry David Thoreau
During these hot, summer months this garden project allows you to “get your hands in the dirt” without much exertion…and even if you don’t feel like you “have a green thumb” you’ll find making these succulent arrangements, easy and rewarding.
There’s something satisfying about getting your hands in the soil.”
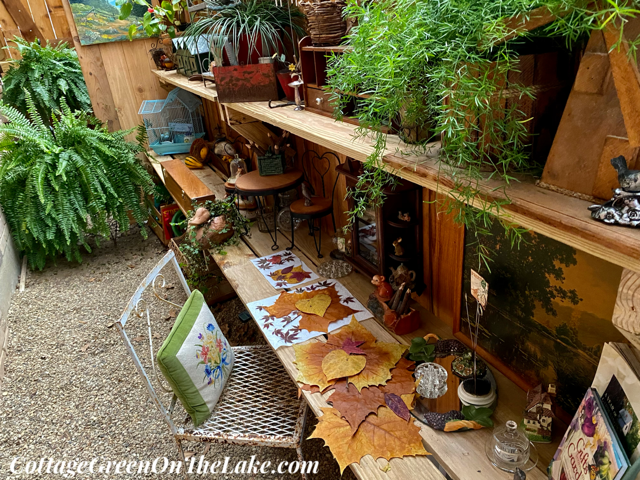
…my warm, little hovel filled with plants, garden tools, baskets, old paintings, antique glassware, forgotten bird nests, flower frogs, and lichen covered bark, would be a delightful place for mixing potpourri.
In my last post I wrote about the charming nook, a “flower apothecary” of sorts that I created in our cottage greenhouse. (click here to read) Since then, I’ve been stirring up all kinds of mixtures and potpourris made from dried rosebuds, daisy petals, lavender, vanilla, jasmine, and other fragrant flowers and scents.
As I looked around the greenhouse, my idea began to grow; my warm, little hovel filled with plants, paintings, antique glassware, forgotten bird nests, flower frogs, and lichen covered bark, would be a delightful place for mixing potpourri…an apothecary of sorts.
During this time of the year, “all is calm, all is quiet” on the lake and it’s a lovely time of year for playing in the cottage greenhouse. Not only did my plants need watering, but I had come out to the greenhouse to check on the roses and statice I’d left hanging upside down from the greenhouse rafters to dry.
It was a delightful day to be working outside in the Cottage Greenhouse. In my cozy shelter, I was protected from the cool, north wind…surrounded by smells of earth and growing things, soothed with a background of birdsong, and the greenhouse door was opened to the lake beyond.
It was one of those March days when the sun shines hot and the wind blows cold: when it is summer in the light, and winter in the shade.”
Charles Dickens
It was a delightful day to be working outside in the Cottage Greenhouse. In my cozy shelter, I was protected from the cool north wind…surrounded by smells of earth and growing things, soothed with a background of birdsong, and the greenhouse door was opened to the lake beyond.
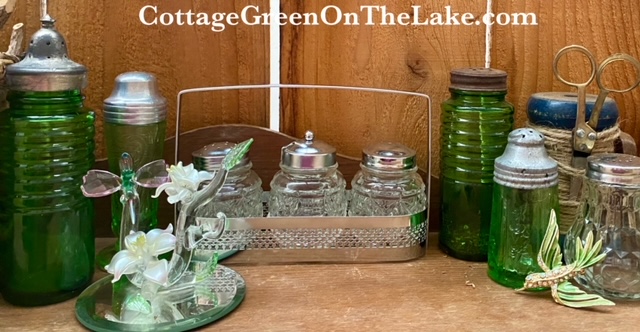
I love Depression Glass salt and pepper shakers: their colors, lined details, embossed flowers, and their ruggedy little tops that are dented and worn, whisper of days forgotten, if you listen………………
It’s almost spring and to celebrate I have 2 sweet bunny gifts to give away for 2 lucky winners, just in time for Easter! I’ll give you the complete set of instructions on how to enter, at the conclusion of this post. It seems so long ago since I wrote my last blog, on decoupaging terra cotta planters. A lot has happened since then and I’m sorry, I am just now writing again. Four weeks ago I had a terrifying experience when I was out in the cottage greenhouse.
I’ve always wanted to grow my own herbs and have fancied having a pair of those cute little herb scissors to clip fresh rosemary to sprinkle over hot plates of spaghetti or to cut a sprig of mint to add to tall glasses of ice tea in the summer.
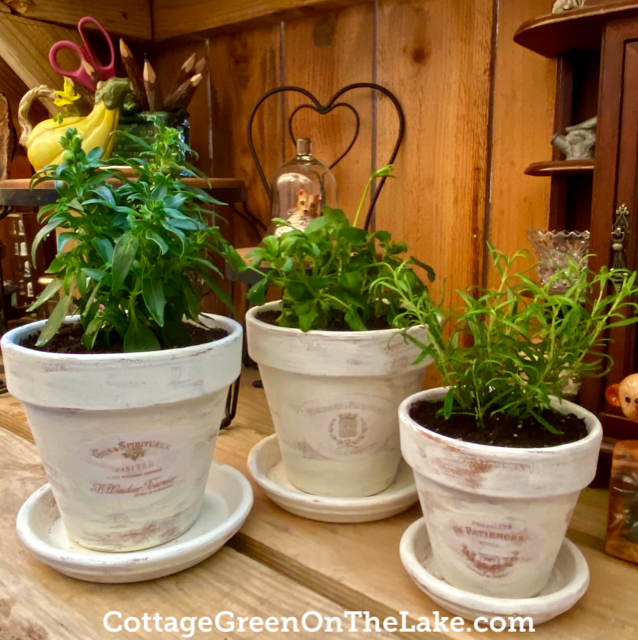
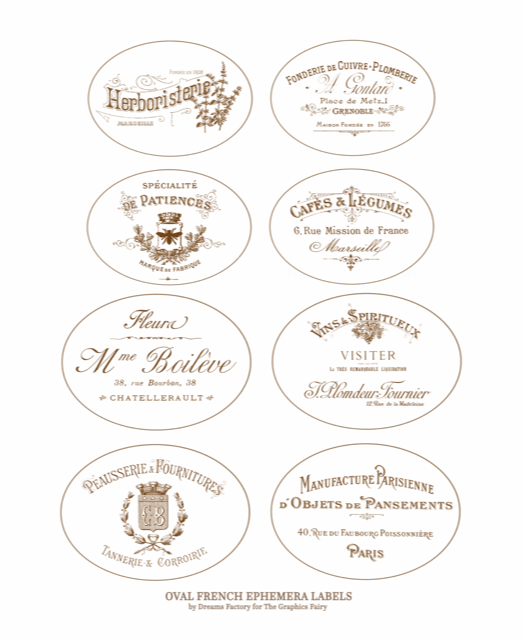
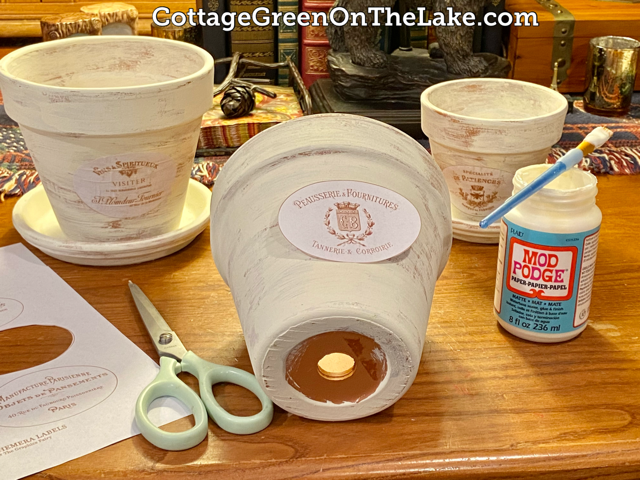
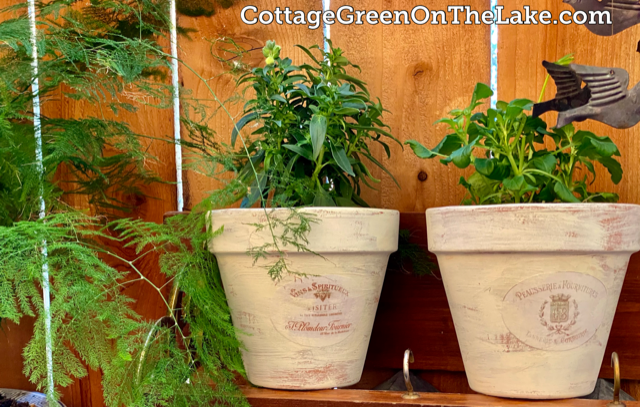
Some Parisienne whimsy and a sweet Valentine gift, these chic French flower pots are charming and they are so easy and fun to make. I’ve always wanted to grow my own herbs and have fancied having a pair of those cute little herb scissors to clip fresh rosemary to sprinkle over hot plates of spaghetti or to cut a sprig of mint to add to tall glasses of ice tea in the summer. So when I saw these free, printable labels from The Graphics Fairy(click here for link and full size printable PDF) it was just the motivation I needed to get busy and make some sweet little containers to start my very own ‘herboristerie’ – French n. herbalist’s shop(; I’ve already used the labels on 3 terra cotta pots I painted and the look of the aged and vintage patina with the French labels peeking through is perfecto!
French labels from The Graphics Fairy
Supplies Needed for Making French Flower Pots using Labels:
terra cotta planters and saucers
Mod Podge (I used Mod Podge Matte – water base sealer, glue, & finish)
white acrylic paint (I used Apple Barrel “antique parchment”)
bristle paint brush (sponge brushes do not produce the desired texture and streaking effect)
scissors
paper to protect work surface you paint on (I used wax paper)
Cover work surface with wax paper or other protective covering
Dip paint brush into the paint, wiping away any excess paint on the brush before applying the paint to the planter.
Continue painting planter with this dry brush technique, wiping away any excess paint on the paint brush before applying the paint to the planter – paint predominantly in the same direction, except for some random strokes “here and there” to add dimension and depth – apply paint thicker in some areas than others – and allow the terra cotta color to show through in parts to resemble an aged pot
Paint inside of planter for uniformity
Allow paint to dry (it dries quickly)
Cut out desired French label and apply Mod Podge to the back of the label and adhere the label to the planter
Paint over the label with Mod Podge to seal and allow label to dry
Brush white paint lightly over label in different areas to make the label “blend” into the pot
Allow label to dry
Cutting out labels and adhering with Mod Podge
As soon as the Mod Podge was dry, I took my little pots out to the Cottage Greenhouse, sat down at my potting table and began filling them with potting soil. I did have a rosemary plant to plop into my first container for future plates of spaghetti, and though I didn’t have a peppermint plant, yet (I have one ordered) I was happy I had a snapdragon loaded with buds, and 2 golden orange pansies that were waiting for my new containers.
My sweet little rosemary planted in a Specialite De Patiences French Pot with a Queen Bee on the front.
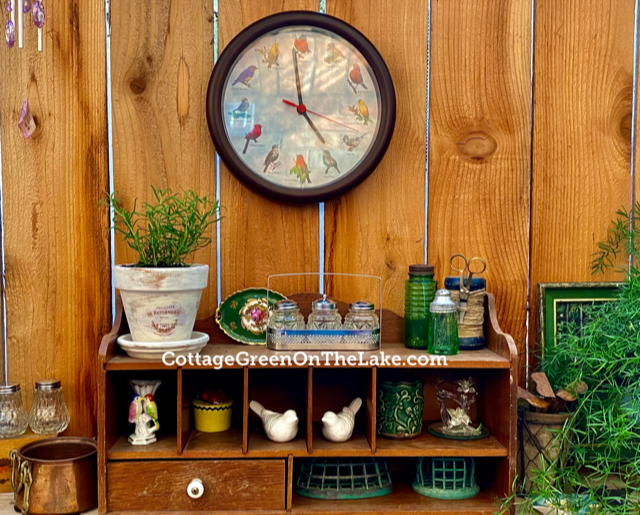
This battered, old cubby holds all kinds of fun garden paraphernalia and the rosemary planter fits right in among my collection of floral frogs and antique salt and pepper shakers. The Depression Glass green shakers are my favorites with their shabby little screw caps that are dented and worn. They all look pretty and winsome sitting about, but they are dual purposed and make great containers for tiny things. I use them in the Cottage Greenhouse to store the seeds I gather from my flowers and trees.
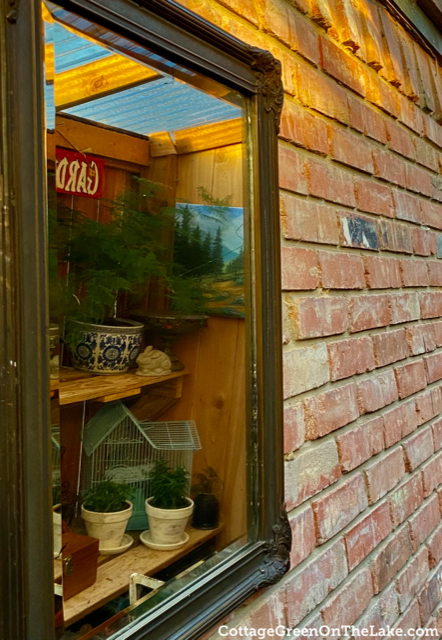
In the greenhouse looking glass.
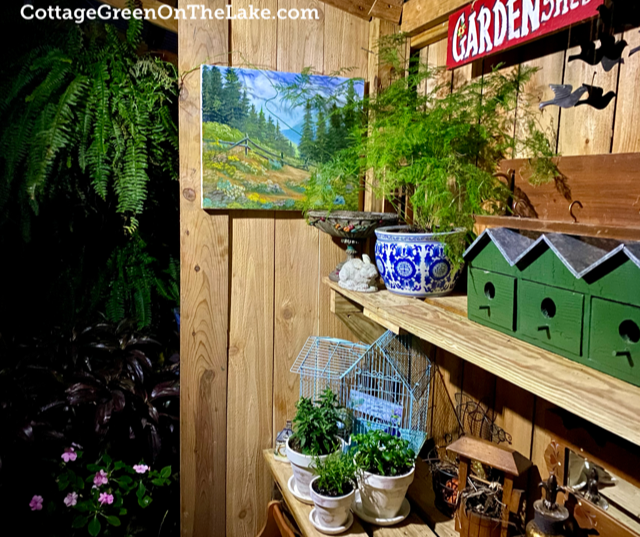
My plants winter residence. (:
The other night it was supposed to get close to freezing so I went out to my greenhouse after dark, to turn the heater up. Richard put lights in the greenhouse for me, but I didn’t bother to turn them all on, and only flipped on 1 switch. The corners were shadowed and the back of the greenhouse was dark. I enjoyed seeing this new, nighttime look in the greenhouse without the sun pouring in. I felt like a kid under the sheets with a flashlight peeking around at the looming shapes, while I walked to the dark back corner of the greenhouse.
I have a clock hanging over my potting table that has 12 pictures of birds on the face of the clock. Each hour, a bird song is “trilled out” corresponding to the bird pictured for the hour. (See picture of the bird clock, 2 pictures above) Right as I was walking by my potting table, the bird of the hour, the Wood Thrush started trilling out his song and scared the wits out of me. After I got over my fright, I had to smile as the lines to Edgar Allen Poe’s poem, “The Raven” came to mind…”Once upon a midnight dreary, while I pondered, weak and weary.”
I hastily turned on another lightand “Presently my soul grew stronger, hesitating then no longer” I turned the thermostat on the heater up, and after all…still thought my cottage greenhouse looked enchanting by nightfall.
I took a picture for you to see; notice the dark shadows toward the back of the greenhouse when all the lights are not on. By the way, the thermometer in there read 63 degrees and my plants looked very cozy when I turned out the lights and let myself out. (:
My shabby chic white-washed French planters that only cost me a $1.48 each! Fill them with fresh herbs and they would make delightful Valentine’s Day gifts for your friends and neighbors! To make things even easier for you, most grocery stores keep live herb plants stocked in their Produce Section. I ordered my live rosemary plant when I made out my Wal Mart grocery order and it was only $2.98 ! (P.S. I have already added the Mint and Basil live herbs to my shopping cart for my next on-line order!)
Au revoir!(:
From my cottage to yours ~ Trenda
I am delighted you read my blog today and I’d love to hear from you! Please leave any questions or comments you have in the comment section below. Don’t be dismayed if you don’t see your comment immediately after you write since all comments go through Word Press and have to be approved before posting. If you would like to read each new post I write and have it delivered directly to your email address, just click FOLLOW in my post above and follow the prompts.
Twilight was closing in which was a signal to the Loons to begin their enchanting love calls over the lake.
Auld Lang Syne and best wishes for the brightest and merriest of new years! You know I haven’t written you since last year (; so I need to write about the last bit of our 2020 before I begin writing about the new year. Get comfy and pour yourself something warm to drink, and as a dear friend and I say to one another, “Let’s drink some tea and talk of happy things.”
It was a wonderful Christmas season filled with bustling and busy-ness, yuletide cheer, and enough merry making “to make the season bright.” Then on the night of Winter Solstice we all had the added excitement and wonder of the celestial 2,000 year phenomenon of Jupiter and Saturn coming so closely aligned in their orbits they appeared as “a double planet” and were nicknamed the Christmas Star. All-the-while, our days were intermingled with the holiness and awe of the season as we reflected on what Christmas truly means and marveled anew that Jesus chose to come down to earth as a little baby to be our Savior.
A thousand times in history a baby has become a king, but only once in history did a King become a baby.
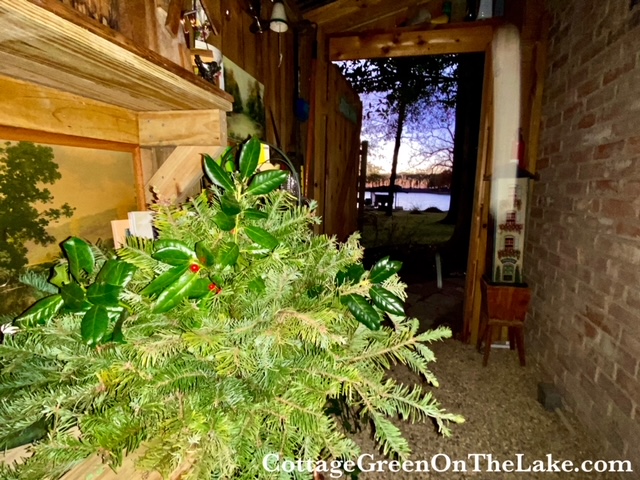
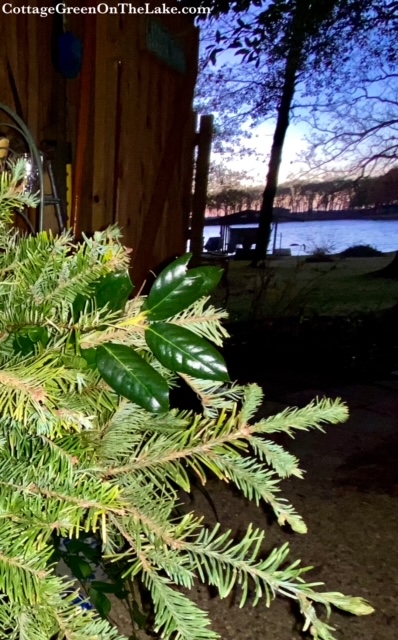
As usual I ran out of time to do all I wanted to do. However, one fun project I did have time to do was to make a beautiful evergreen centerpiece. I wish I could share with you the wonderful, heady, fir fragrance that enveloped my greenhouse while I was making it! The beautiful winter day was fading into twilight, but it was still warm enough outside to leave my greenhouse door open to see the lake and hear the birds twittering as they enjoyed their evening meal together at the bird feeders, while I worked.
The fir boughs I was using I had saved and kept fresh in 2 big buckets of water in the greenhouse ever since Richard had trimmed them from our Christmas tree. I had plenty of branches to work with, but I still needed a little texture and color to mix in with my fir branches. Out into the backyard I went to forage with pruners in hand. I experienced a little thrill of resourcefulness when I found the perfect filler I needed…pointed, deep green, holly leaves with bright red berries from our very own holly bushes! I couldn’t help myself and began humming “The Holly and the Ivy” while I was clipping.
The holly and the ivy,
When they are both full grown
Of all the trees that are in the wood
The holly bears the crown.
I was back in the Cottage Greenhouse, ready to make my arrangement, still humming, now on the refrain…
O, the rising of the sun
And the running of the deer
The playin of the merry organ
Sweet singing in the choir
All done, just in time with the last light fading away.
The holly bears a blossom
As white as  lily flow'r
And Mary bore sweet Jesus Christ
To be our dear Saviour
My simple arrangement looked elegant on our woodland table and red tapers and red votive cups enhanced the red of the holly berries.
Then the Christmas season blended into New Year’s Eve and our son and daughter in law asked us to spend the festive evening with them and our 2 grand babies. <3 Our DDIL had prepared a Mexican feast for us and we had corn and flour taquitos served with her homemade sausage queso and pico de gallo, Chicken Enchilada Dip (click here for recipe) served with chips and veggies, and a delicious Key Lime Pie. We spent the evening just enjoying each other’s company, watching the antics of our grand children, and toasting in the NewYear with some sparkling White Grape Juice.
Write it on your heart that every day is the best day in the year…This new day is too dear, with its hopes and invitations, to waste a moment on the yesterdays.
Ralph Waldo Emerson
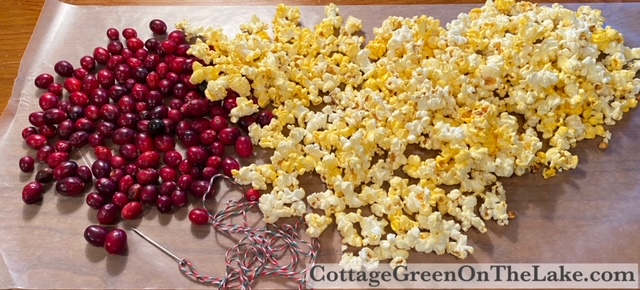
Then, this weekend SNOW was forecasted for us! It was the perfect time for another fun winter project I always enjoy doing, especially on a cold winter afternoon during NFL Wild Card Weekend; I made treats to decorate a tree for the birds! Click on the highlighted link to see another one of my posts about DIY bird treats… “A Picnic for the Birds” Since reading all the Laura Ingalls Wilder books when I was in elementary school, I’ve always wanted to string popcorn. Finally, after all these years, I decided to do it. Unlike Laura, who had to pop her corn over the kitchen fireplace, I conveniently got a bag of popcorn out of our cabinet and placed it in the microwave. While the kernels were popping, I set out some fresh cranberries I wanted to add to my popcorn string, found some cute red, green, and white cording to use for stringing, and a tapestry needle.
Helpful hints to make popcorn stringing easier:
Stale popcorn is easier to string than fresh, crispy popcorn. Pop your popcorn the night before and spread it out on wax paper so your popcorn will be easier to thread the next day.
Use a smaller needle and thread. A tapestry needle is blunt and much larger then a regular needle. It is a great choice if you have young children that are helping you that you don’t want to get hurt when working with a needle, however, it is harder for the large tapestry needle to go through the popcorn without breaking the popped kernel. After a few trials, I switched to a finer needle and just “doubled” sewing thread instead of using the thicker cording I had been using. I was amazed how much quicker and easier the stringing became!
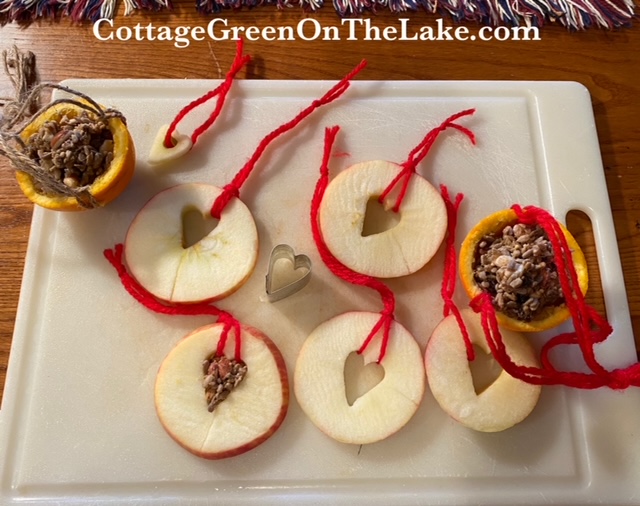
After I got through stringing my popcorn and cranberries, I cut a grapefruit, an orange, and a lemon into thin slices to dry in the oven and hang as ornaments and treats on my bird tree.
Directions:
Slice your choice of fruits (I used 1 grapefruit, 1 orange, and 1 lemon) into thin rounds.
Pat both sides of fruit with a paper towel to dry and place the slices on a cookie sheet covered with parchment paper.
Preheat the oven to 200 degrees and bake fruit slices for 1 hour.
Turn slices over after the first hour and continue baking for another 1-2 hours, checking periodically to make sure the slices don’t burn
Total baking time, 2-3 hours, or until fruits are dried and transparent
Remove from oven
When cool, make a small slit in each fruit round near the rind to insert jute or yarn for hanging.
Next, I cut apple slices and used a mini cookie cutter to punch out heart in each apple slice. After the apple slices, I made sweet little orange cups and filled them with a mixture of peanut butter, corn meal, and bird seed.
Directions for Apple Slices w/heart cutout:
Cut apple in thin slices
Brush slices with lemon juice to keep apples from discoloring
Use a mini cookie cutter to punch out a heart in each apple slice
Insert yarn through heart and tie for hanging…or fill heart cut out with peanut butter seed mixture
Directions for Orange Seed Cups :
Cut orange in half and scoop out orange segments and pulp
Dry inside of both orange halves with a paper towel
Using a knife, make 3 holes near the cut edge of each orange half, making sure the holes are evenly spaced around the circumference of your orange
Insert jute or yarn into each hole and tie a knot to secure each strand to the orange, allowing extra length of yarn/jute for hanging (see picture below)
Knot the 3 strands of jute/yarn together at the top for hanging
Fill cups with birdseed or…I made a blend of peanut butter, cornmeal (adding cornmeal to peanut butter makes it easier for the birds to swallow) and birdseed to fill each orange cup
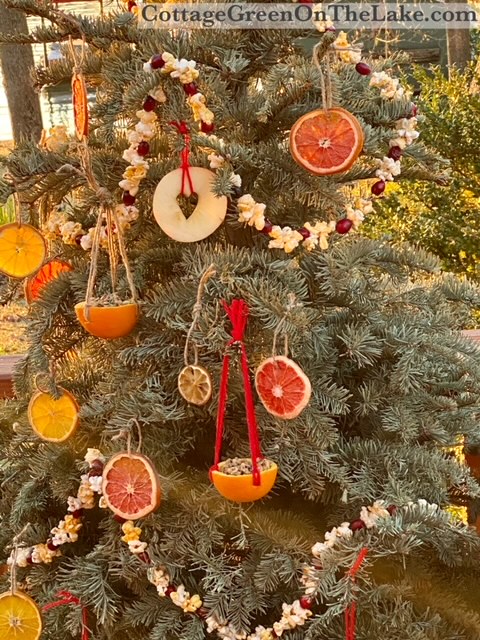
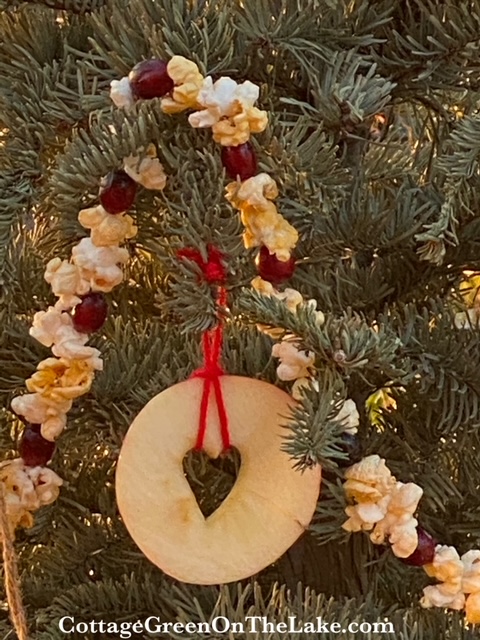
All the special treats for the bird feast were done and I hung them on what-had-been our Christmas tree. Strings of popcorn and cranberries, stained glass grapefruit, orange, and lemon slices, apple slices with little punched out hearts, and charming orange cups soon filled the tree. When I had finished, dear Richard, who always goes along with my whims, carried the whole tree up to the landing on our stairs where I could watch the birds from my chair. Just look how cute the tree looks perched up there!
“Bon Appetit!”
Sweet apple rounds underneath an appetizer of popcorn and cranberries.
Everything for the next day was done; the fruit ornaments and festoons of popcorn strands were hung. A winter feast awaited my feathered friends and the only thing needed was the predicted and unaccustomed snow for our area in East Texas.
After taking some pictures, I was sitting on the upper stairs hoping to see some late visitors, though I knew it was unlikely at that hour. [Side note: Did you know that by 4:30 (here in East Texas) most birds have quit feeding and are already tucked away, safe in their nests? The cardinals are usually the latest birds to arrive at the feeders. My guess is they use the evening shadows to help diminish the visibility of their bright red feathers which makes them more vulnerable and highly visible to predators.] Twilight was closing in which was a signal to the Loons to begin their enchanting love calls over the lake. While I was enthralled and still listening to the Loons, 2 bald headed eagles flew by right above me, only 25 feet from where I was sitting! My winter evening came with gifts. <3
And the next day, even earlier than predicted, our snow came!
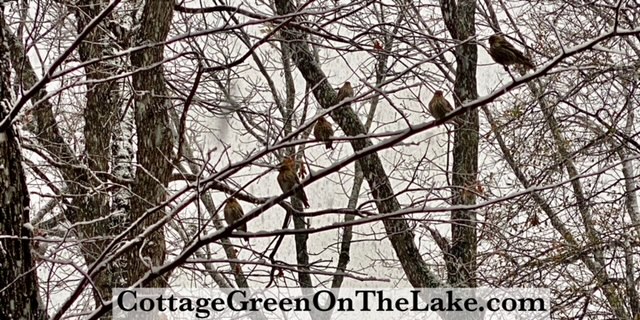
The birds lined up in pecking order [which is a very important social order and strictly observed at our feeders!] Woodpeckers, with their strong, swift beaks are given the highest respect, with the Blue Jays next in line since they are bigger than most of the birds we typically see at our feeders. Regal Cardinals seem indifferent to all, but their own mate and cautiously watched from the snow covered branches eyeing and picking out which treats they wanted before they approached. The Junco’s, or Snow Birds as they’re commonly called and the Carolina Wrens happily ate the treats that fell to the deck, thus avoiding the wait and the line. The rest of the crew, the sweet, smaller birds, the Carolina and Black-capped Chickadees, all the Finches (the American Goldfinch, House Finch, and Red Finch) Warblers, and Titmouse stayed close by, flitting in and out, and rested on the branches between courses.
Beautiful, beautiful snow! I couldn’t get over it’s loveliness and how it felt falling “on my nose and eyelashes.”
or… thinking how clever God is to imagine and be so creative that He made what usually comes down as rain in other seasons, into something soft, fluffy, and fun to play in, just to soften the landscape and mood of winter.
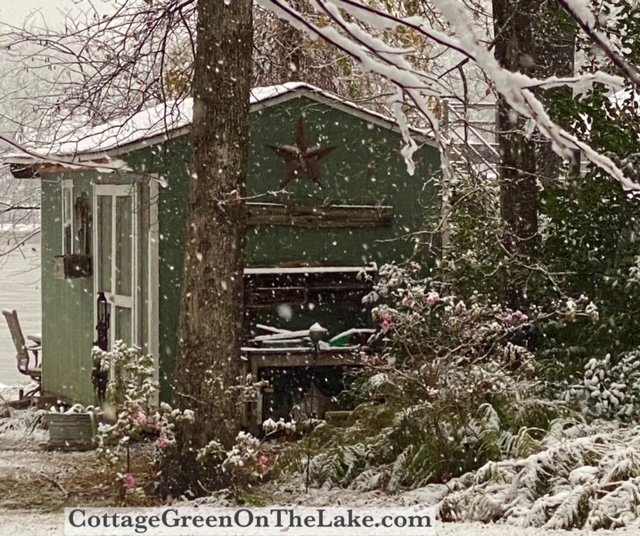
Look how enchanting my Potting Cottage looks in the snow!
Well, I think that catches us all up. Our snow was a delight for the day, and the next day the sun was shining brightly and only the bravest and most stalwart of snowmen remained. Bemusedly, when Richard brought in the mail yesterday there on top of the stack of mail was my Burpee Seed Catalog, filled with the promise of Spring, zesty-mix zinnia’s, and Gloriosa Daisy’s!
From my cottage to yours ~ Trenda
I’m delighted you read my blog today! I’d love to hear from you! Please leave any questions or comments you have in the comment section below. Don’t be dismayed if you don’t see your comment immediately after you write. All comments go through Word Press before posting. If you would like to read each new post I write and have it delivered directly to your email address, just click FOLLOW in my post above and follow the prompts.
Summer's loss
Seems little, dear! on days like these.

~ Ernest Christopher Dowson
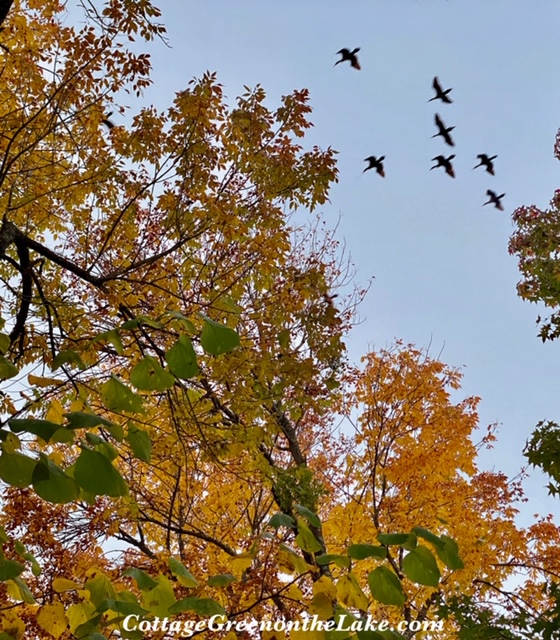
“On days like these” the leaves on our Redbud and Ash Trees glowed golden yellow in the sunlight and to our delight the double breasted cormorants that winter here glided into our cove by the hundred’s.
“On days like these” geese flew by in waves with the swoosh of their wings heard, before they were seen silhouetted against autumn blue skies.
“On days like these” leaves drifted by on wayward breezes and looked fetching against the green backdrop of grass.
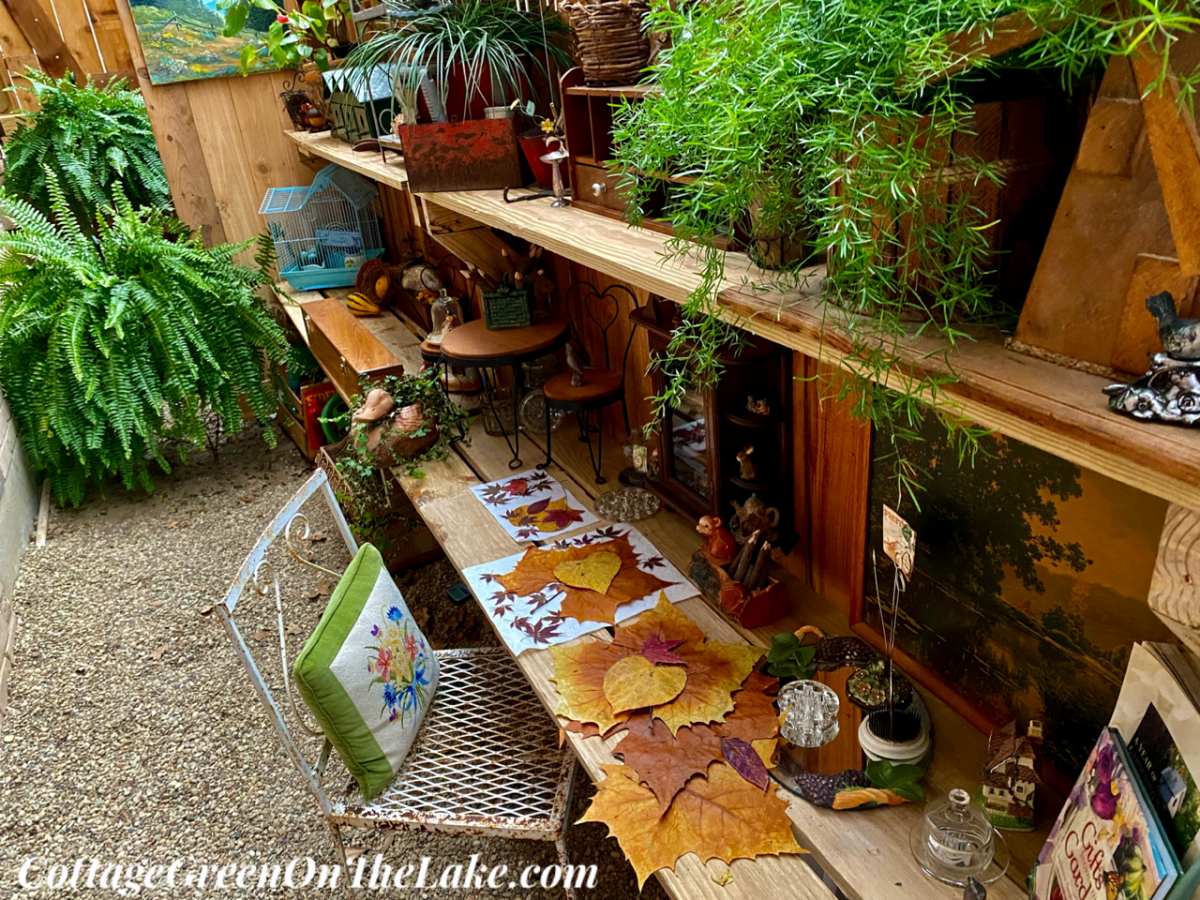
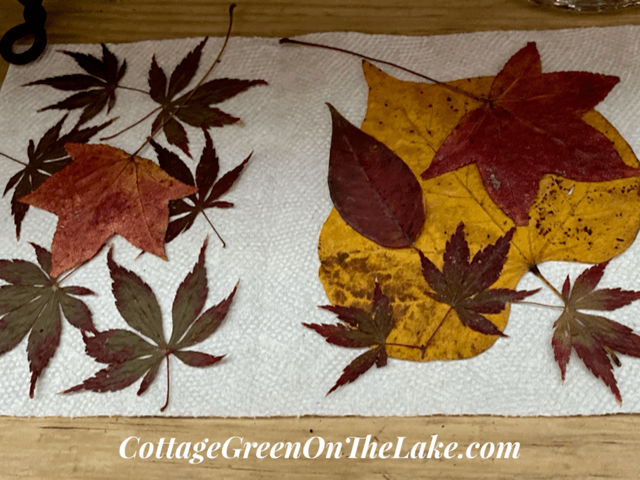
Just look at all these glorious, autumn leaves I collected and preserved!
Scarlet Sweet Gum leaves, Burgundy Japanese Maple leaves, Burning Bush leaves, and yellow Redbud leaves
Burnt orange Sycamore leaves, yellow Redbud leaf, and burgundy Japanese Maple leaves
Our winter’s come delightfully late here in East Texas and our first freeze of the year wasn’t predicted until Monday night, the last night in November. That afternoon I carried my outdoor plants into the greenhouse where Richard was busy getting our heating system and thermometer all set up. After I got all the plants tucked away in their winter home, I went around the yard and clipped as many flowers as I could. Knockout Roses, impatiens, chrysanthemums, and Encore Azaleas were still blooming beautifully and the bouquet in my hands kept getting bigger and bigger, since I hated to leave any blossoms. I had lots to work with and made some sweet little arrangements to place around the house.
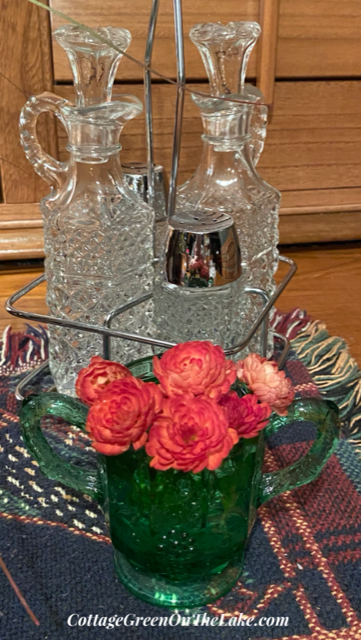
A cluster of azaleas drape over the edge of this pink and green sorbet dish. Richard bought this miniature violin for me. The strings actually pluck and are wound into the pegs!
Deep red-orange chrysanthemums look striking against the green of a Depression Glass sugar bowl. Look at this sweet little antique vinegar & oil caddy with salt and pepper shakers I recently found on a trip we took to Branson.
Take a detour with me for a moment and look at 3 more treasures I found on our trip…these green Depression Glass shakers! I’m keeping them in the Cottage Greenhouse; they’ll be perfect for storing seeds I gather from my flowers.
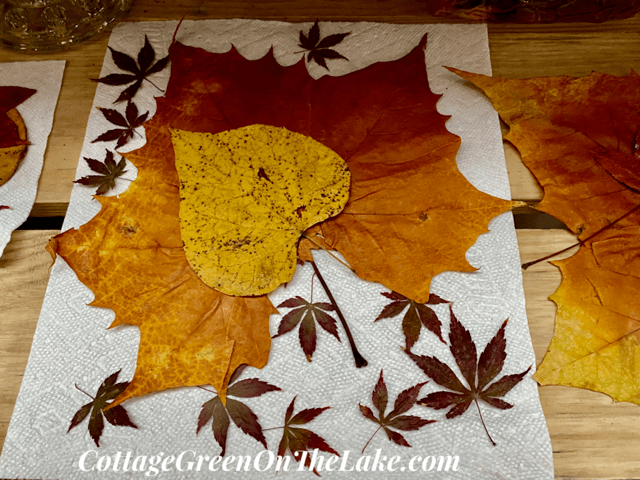
Back to leaf and flower pressing! (: The rest of my gathering’s I laid out on paper towels to press and dry beneath a pile of heavy books. It is so satisfying drying flowers, ferns, or leaves – and being able to use them later to decorate a tablescape, make a centerpiece, or use them in some other project adds another dimension of enjoyment.
How to Press Leaves & Flowers
Choose leaves that are fresh and supple…and flowers that are NOT densely petaled
Place items you want to press on a paper towel or newspaper, making sure the leaves/flowers do not overlap
Place another paper towel or newspaper on top of the items you are pressing
Place the sandwiched leaves/flowers inside a heavy book, or stack heavy books or objects on top of the paper towel “sandwich” and keep in a dry location
In approximately 2 weeks the pressed leaves/flowers will be completely dry and ready to use
Next post I plan to show you a fun and easy project using some of my pressed leaves. Hope you enjoy these last days of autumn and have fun gathering leaves and pressing them.
From my cottage to yours ~ Trenda
To have all my posts delivered directly to your email address, just click on FOLLOW in the post above … or click on my site: cottagegreenonthelake.com
"At these times, the things that troubled her seemed far away and unimportant; all that mattered was the hum of the bees and the chirp of birdsong, the way the sun gleamed on the edge of a blue wildflower, the distant bleat and clink of grazing goats." ~ Allison Croggon
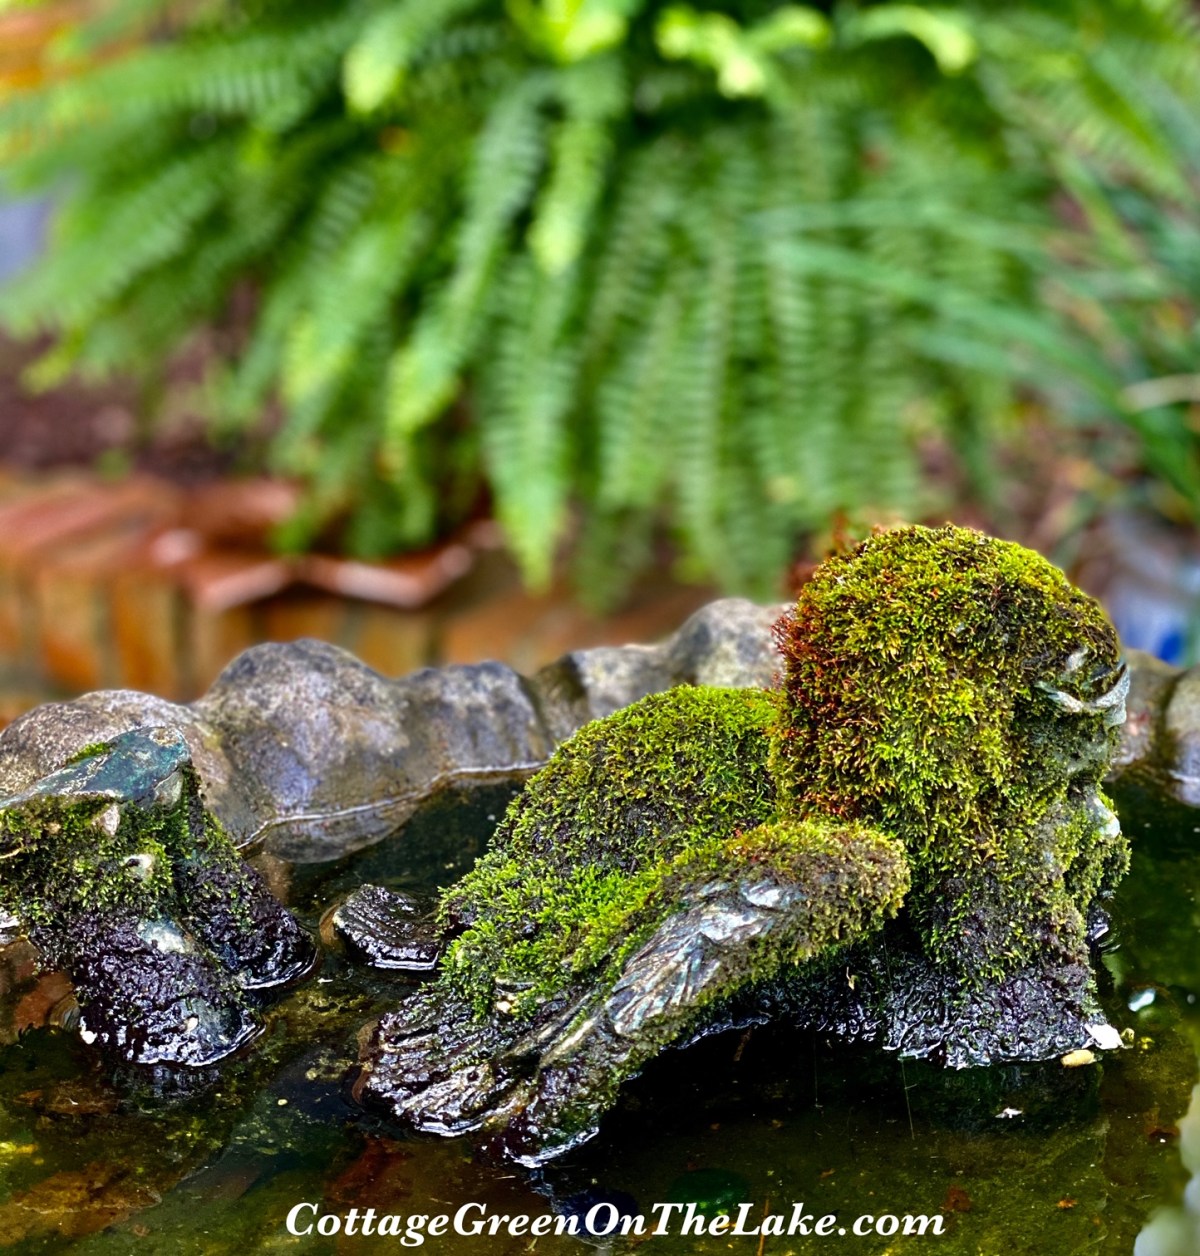
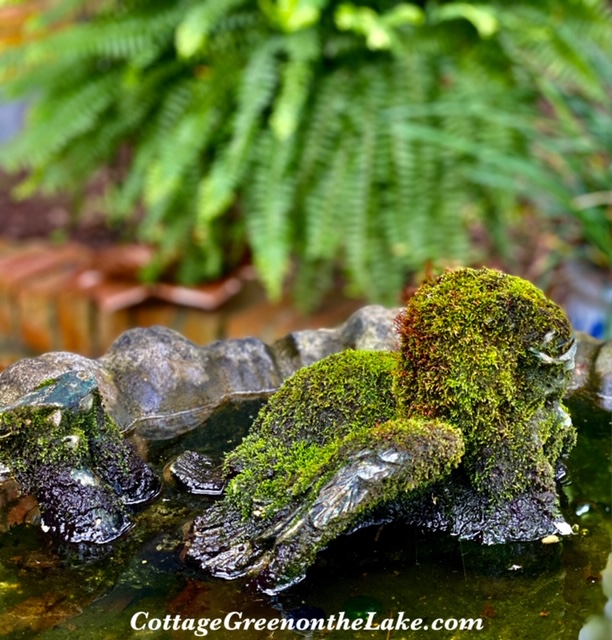
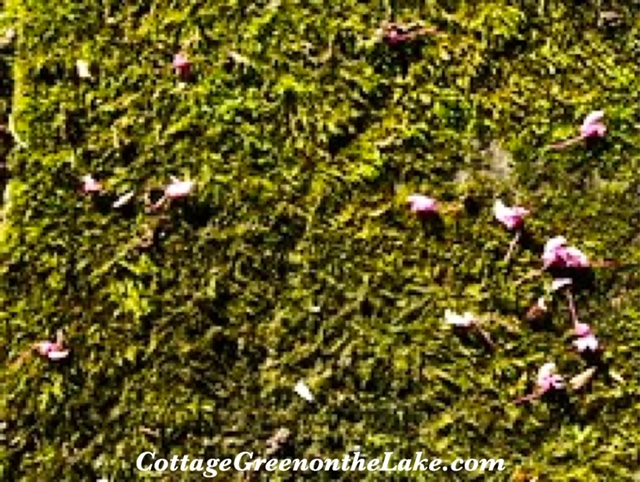
Moss covered anything makes me a little dreamy and after I wrote the post showing our moss covered pathwayand this sweet moss covered cherub in our birdbath, I had so many comments and questions asking how I get my moss to grow, I thought I’d write about it.
Some things you need to know about moss before you try to propagate it. Moss likes shady to semi-shady places, acidic soil, and moisture. Moss can grow on almost anything and doesn’t require dirt to grow. If you are trying to grow moss in an area where there isn’t any moss, you will need to have a moss “starter” since moss grows from spores, rather than roots.
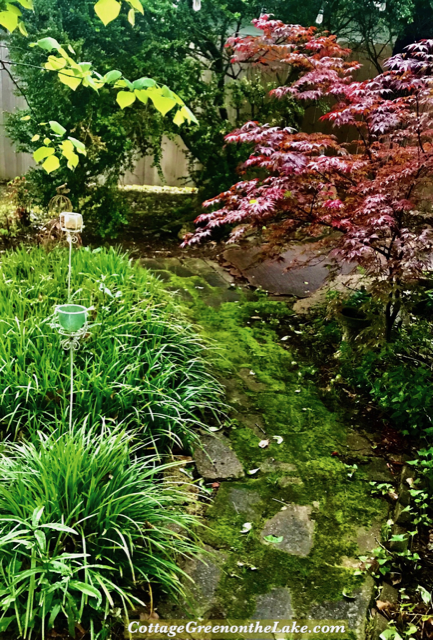
Redbud blossoms sprinkled on our pathway of moss
Instructions How to Grow or Propagate Moss
It’s fun hunting for the moss you’ll need to begin propagating your own moss. Collect moss from areas that already have live moss growing on them…from your yard, a park, moss that is growing on trees or structures, or ask friends or neighbors for a moss starter.
Gather your moss in any container that is easy to clean and rinse out. I use a shallow terracotta planter.
Break up the clumps of moss, using garden tools or whatever else you have handy. I use an antique pastry blender that I keep in the Cottage Greenhouse to break up and blend my “moss pies. (See picture below)
To the collection of moss in your container, add equal parts of buttermilk and water, and mix together until your moss, buttermilk, and water is the consistency of a milkshake.
“Paint” or pour your moss milkshake on the surfaces you want to cover with moss.
Keep your new moss moist and “weed free, since weeds rob the moisture that is needed by your moss.
It will take approximately 6 weeks before your new moss begins to spread
Terracotta planter and antique pastry blender I use for mixing moss
Cherub statuary in birdbath covered in moss
I just began re-growing this moss on our courtyard pathway this spring after we power washed off the moss that had been growing there. When moss needs moisture it starts looking dull and dried (like in the picture below.)
Now, look at the color of the moss in this picture. Notice that the moss is brighter and greener, but also that the moss is spreading, since it is getting more moisture.
Raccoons and other furry folk have a habit of overturning new moss beds, or pulling up chunks of moss to look for bugs. Don’t fret if this happens, just smoosh your moss back into place, and water.
More Redbud petals sprinkled on the moss beneath the tree
Lush moss bed along our garden path that I propagated.
To transplant moss…find and dig up the moss you want to transplant…keep it moist until ready to transplant…press the moss into the surface where you want it to grow (remember, moss doesn’t require soil to grow, but can also grow on other surfaces.) I spied this little clump of moss while Richard and I were gathering some walnuts along an old ferry road down by the river. Dear Richard dug up the moss for me to take home and the sweet little wildwood fern that was growing right in the center, came along with it! I kept the moss damp by wetting some paper napkins and wrapping the moss in it, placed the wrapped moss inside a plastic bag, and tied the top of the bag together until we got home. I can tell by their vivid green colors that the moss and little fern love their new location where I pressed this little patch of forest-floor into our gravel bed! (:
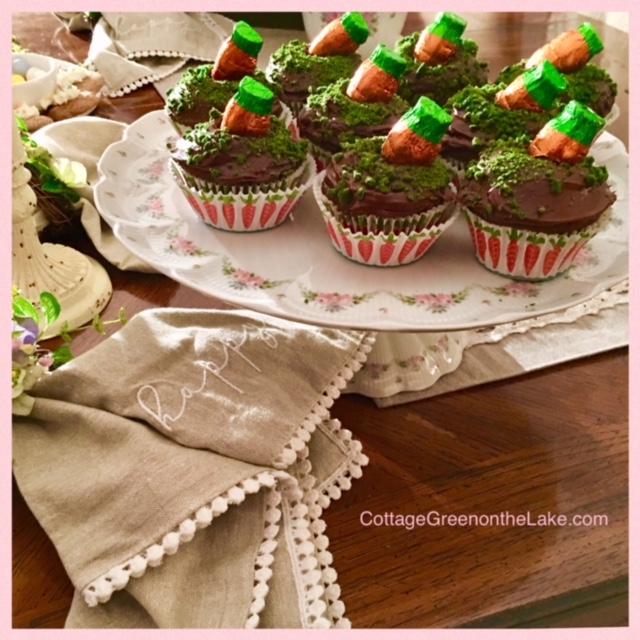
Let me know if you try propagating your own moss! And for more moss enchantment…click on Carrot Patch Cupcakes with edible crumb “moss” made out of graham cracker crumbs! (:
From my cottage to yours ~ Trenda
P.S. This past 6 weeks has been a series of emotional peaks and valleys for us. I had a wonderful and miraculous report from the doctor…then we got the heartbreaking news that my dear, youngest sister had died suddenly and unexpectedly. Every step of the way, “Even though I walk through the valley of the shadow of death, I will fear no evil for Thou art with me.” Psalms 23:4 Oh, I am heartbroken that during this short lifetime on earth, I will never see my sister again, but I am overjoyed knowing we will be together again in heaven, since she and I both know and believe in Jesus. If you don’t know Jesus and do not have a personal relationship with Him, He is just a whisper away. The Bible says, If you confess with your mouth, “Jesus is Lord,” and believe in your heart that God raised him from the dead, you will be saved. Romans 10:9 If you long for that security and relationship with the Lord where you “fear no evil for Thou art with me,” please go to the top of my blog and click on the page ABOUT ME …then click on My Faith in Jesus Christ. If you have any questions, or you would like me to pray with you about anything, please let me know in the comment section below, or write me at: cottagegreenonthelake@gmail.com
To have all my posts delivered directly to your email address, just click on FOLLOW in the post above … or click on my site: cottagegreenonthelake.com