DIY Autumn Leaf Drink Markers …… by Trenda from Cottage Green on the Lake

It’s time to hang our autumn wreath on the front door; time to put out “Hal” … our wooden scarecrow with a green trellis backdrop and spunky black crow perched on the railing, and time for home fragrances and candles in mellow, spicy scents of autumn.  It’s time for the magical transformation of our home, putting “touches” of the season on tabletops, mantles, and throughout each room that reflect the warm, cozy feeling of autumn. <!–more–>

So far, the chandelier is dressed for autumn with leaves, grape clusters and a draping of golden acorns.

piccollage187579

And … summer decor on the buffet is slowly being replaced with pumpkins, bushy-tailed squirrels, and glittered acorns.

piccollage

Dressing our home for the fall season includes how I set my table … which dishes I use, which napkins I match up with what napkins rings, and all the other “accoutrements” I have to accent my table … “4theseasons.”

I made the cutest autumn drink markers that I want to show you how to make today.

piccollage194265

I bought all the supplies I needed at Hobby Lobby on the bead/jewelry-making aisle.  The wire loops, tube of assorted beads and cards of autumn leaf buttons were all on this aisle.  The only other item that I used in making these drink markers was a pair of needle nose pliers, which I used in bending one end of the wire loop to slip and secure the drink marker into the eye-hole, after all the beads and leaf were in place.

piccollage203736

These are so easy to make … Just take the size wire hoop that you want to use for your drink marker and begin “threading” beads in whatever order  you choose.  When you have half of the ring filled with beads, put on the size and color of leaf that you want to use for your drink marker and continue threading on the other half of your beads, matching the sequence you used on the first side.  Make sure you leave room at the end of your wire loop to make your fastener.  After all your beads are threaded, bend the very end of your wire hoop so it will slip into the wire eye on the other side of the hoop, and fasten. (Notice how the end opposite the “eye” of the wire hangers are straight before I bent them to make a fastener.  I’ve also turned some of the leaves over so you can see that they are just buttons!)

piccollage206514

Our family get-together’s range from small to large gathering’s so I made lots of drink markers and had fun using all different bead color combinations and sizes of leaves.  We always reserve the biggest leaf for my husband and our youngest grandchild gets the smallest leaf … and everyone remembers which glass is there’s by the color and size of their leaf!

PicCollage[194638].png

Now that you know how to make your drink markers, it’s fun to pick out different buttons and beads to make markers for every holiday and occasion. I’ve even bought block letters on the bead aisle and have made one-of-a-kind drink markers for our family using the first initial of every family member. I’ve also made drink markers and added them to wedding gifts as a little “bonus” gift for newly-weds … with their “love” names for each other, spelled out on the drink marker.  Halloween pumpkins and ghosts … Christmas trees and candy canes … Spring flowers and bunny’s … the possibilities are endless!  I hope you have as much fun making these as much as I do!

From my cottage to your’s  ~ Trenda

“Fall” … in love & Harvest Moon Pies by Trenda from Cottage Green on the Lake

“Fall” … in love with the autumn season, colored leaves, cooler days and all things cozy.  Here in Texas, September is just the prelude of the overture to come, but change is in the air; hayfields are filled with freshly baled hay, the little winter coots have returned and last night a gorgeous “harvest moon” rose slowly over the lake. <!–more–>

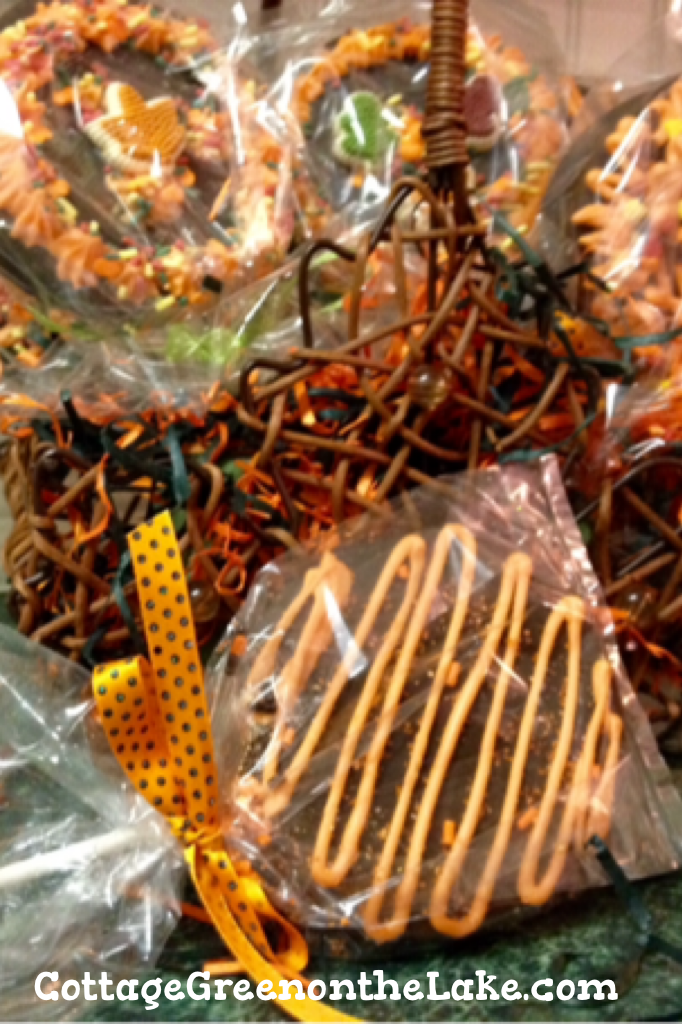
Now, I think you are going to “Fall” … in love with these darling treats … Harvest Moon Pies.   This idea is from a past addition of Southern Living Magazine and I was delighted to find that these desserts were easy to assemble and  almost too cute to eat!  I know we’re going to need more Moon Pies for Halloween  … to decorate with all things spooky!

piccollage

These decorated Moon Pies are a fun addition to any holiday and are a wonderful project for you and your children to enjoy doing together.  Have fun decorating each Moon Pie differently and you’ll finally have a use (if you’re like me!) for all those adorable holiday sprinkles, that seem to amass in your cabinets! (:piccollage1085342.png

I used a wire Maple leaf basket I had tucked away in my “4 the seasons” closet – my sweet hubby built for me!  I put a block of florist foam in the bottom of the basket to anchor and display my Harvest Moon Pies and covered the foam with some shredded black and orange paper I had.  Then, I wrapped each of my decorated Harvest Moon Pies in a cellophane favor bag. (I bought my cellophane bags from Hobby Lobby, they were located on the candy-making aisle along with the Wilton Candy Melts and “lollipop” sticks) and added autumn-colored ribbons around each handle.

I love the novelty of this charming and creative centerpiece, but I also love that they can be given as party favors, since I individually wrapped each of my Harvest Moon Pies!

piccollage

HARVEST MOON PIES/ LEVEL: EASY/  YIELD: 1 DOZEN

INGREDIENTS AND ITEMS NEEDED:

piccollage108309

INGREDIENTS & ITEMS NEEDED:

  • 12 lollipop sticks
  • 2 packages Chocolate Flavor Moon Pies (6 to each small package)
  • 1 package vanilla candy melts – orange colored (I used Wilton’s Candy Melts)
  • 1 zip-type plastic bag or cake decorator bag  
  • scissors
  • wax paper
  • assorted sugar cake decorations (I used Wilton’s leaf shaped decorations)
  • assorted seasonal sprinkles
  • ribbon in autumn colors
  • Decorator Icing

DIRECTIONS:

  1. Insert 1 lollipop stick, 2 to 3 inches into marshmallow center of Moon Pie
  2. Microwave candy melts in a glass bowl at Medium (50 percent power) 1 minute or until melted, stirring once. (read detailed instructions on the back of candy bag) Spoon into your plastic bag or cake decorator bag, push air out and seal.
  3.  Snip a small hole in 1 corner of the bag; pipe melted candy around where the lollipop stick meets the Moon Pie to hold it securely in place.  Lay flat on wax paper and let stand until firm.  *SEE NOTE BELOW
  4. Pipe a fun border of melted candy around the edges of the Moon Pie or pipe squiggles across the top; then add sprinkles, cake sugar or attach candy decorations (ie: candy corn, pumpkins, etc.) using melted candies or frosting

*Be sure and help your little ones insert the candy stick into their Harvest Moon Pie and pipe melted candy around lollipop stick for them. 

I hope you “Fall” … in love with these Harvest Moon Pies  and enjoy making and eating them, as much as we did! (:

There are so many thing to love about Fall!

img_6439118184

“Fall … in love with all things pumpkin!

piccollage116899

“Fall … in love with harvest moons and breezy nights

piccollage77783

“Fall” … in love with hay bales gleaming.

piccollage145315

 “Fall” … in love with yellow leaves, lying on the grass.

piccollage149117

“Fall” … in love with children playing … laughing, giggling.

piccollage79285

“Fall” … in love with FALL!

piccollage152939

From my cottage to yours ~ Trenda