by Trenda
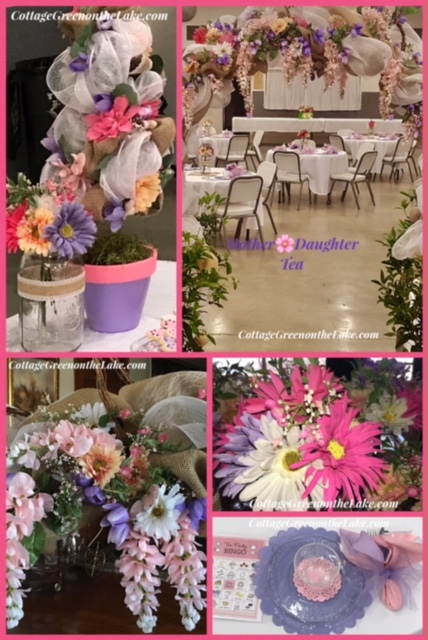
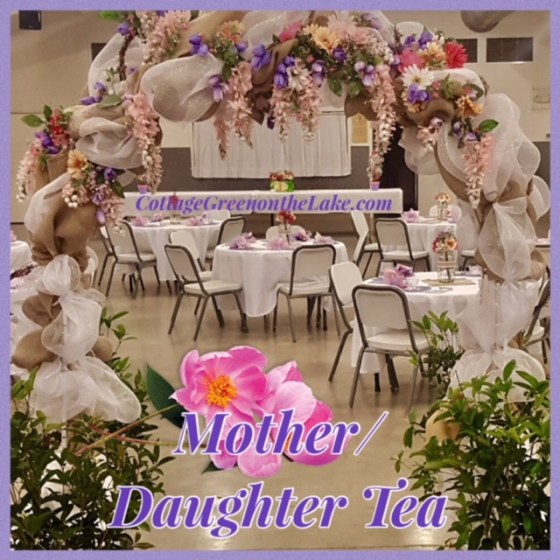
With the coming of Spring there are a lots of opportunities for celebrations. Whether you host a Spring Luncheon, a Tea Party, a Cinco de Mayo Fiesta, a Kentucky Derby Party, a Mother’s Day Brunch, a Graduation dinner, or wedding buffet (whew!) one of the first things you’ll need is a centerpiece to “anchor” your tablescape. Putting together a centerpiece can be daunting task. Recently, I was asked to make the floral arrangements and decorations needed for a Mother/Daughter Tea for the Women’s Ministry at our church. Today I am going to share some of the tips I used when I made the 25 centerpieces needed for the Tea … tips that helped make this job easy and fun!
1. The first thing that you need to decide in making your centerpiece is what color and type of flowers you are going to use. Unless your arrangement is all roses, the general rule of thumb in flower arranging is to use at least 3 different sizes of flowers for visual interest. Do you want your centerpiece to be elegant, rustic, casual, playful, spring-y, lush, or whimsical? These questions will help you decide what type of container to place your flowers in. The theme we wanted to portray for our Mother/Daughter Tea was a combination of three themes: a springtime/rustic/casual elegance theme. Springtime flowers were chosen … daisy’s, daffodils, tulips, narcissus, and wisteria (none too fussy!) in a profusion of spring colors!

2. Mason jars dispel any hint of stuffiness and had dainty embossed filigree on the fronts and added just the right touch of casual elegance. Then, to add texture and a hint of rustic flair, I hot-glued a strip of burlap ribbon edged with lace around each Mason jar.

3. Whenever you work with flowers that are a part of a bouquet, cut each stem from the bunch and trim off all the leaves to make them easier to arrange. To determine the length I wanted my flowers in the centerpiece to be, I gathered the stems of my largest sized flowers (the Daisy’s) and bent the heads of the flowers so they looked natural. Then I cut the stems so my flowers would stand upright in the Mason jar, with the blooms gently draping over the rim.

4. The Mason jars I used will be used again for other events. For ease in changing out arrangements, I wrapped clear packing tape near the flower heads (so the tape wouldn’t be seen) to keep each arrangement together and so they can be easily removed.

5. The smaller flowers … the tulips, narcissus, and daffodils had much smaller stems and were easy to tuck into the arrangement of larger flowers already taped together. These smaller flowers extended beyond the tops of the daisy’s so they would “peek” over the top of the arrangement, adding dimension and interest to the bouquet.

6. The last thing to add to any centerpiece is the “filler.” The filler ties the whole arrangement together. Like the name suggests, filler “fills” in the gaps of the arrangement and “softens” the look of all the separate flowers and unites and blends them into one arrangement. The filler can be … small flowers … baby’s breath … grasses … decorative filament … eucalyptus … seed pods … or any variety of decorative picks.

The filler I used for these centerpieces were tiny flowers and buds with leaves.

Look at all these sweet little arrangements … jars of Spring ready to be placed on the table! Wouldn’t they look charming dangling from a shepherd’s hook lining the walkway to a woodland wedding or filled with sunflowers along the way to a bbq and barn dance? Hmmm … perhaps another DIY on a future post! :)

Wishing you “beaucoups of bouquets” and many happy Spring celebrations! (:
From my cottage to yours ~ Trenda

Thank you for reading my blog! To have all my posts delivered to your email address, just click FOLLOW in my post above … or click on my site: cottagegreenonthelake.com
FOLLOW ME on PINTEREST!
Trenda@cottagegreenonthelake.com

This week I’m joining:
Marie-Helene from Kingsbury Brook Farm
Chloe Crabtree from Celebrate & Decorate
Discover more from Cottage Green on the Lake
Subscribe to get the latest posts sent to your email.


Beautiful!!! Great tips too. For some reason this morning I’m having trouble getting to the web site for this post. Hope this works. Sharon > WordPress.com > cottagegreenonthelake posted: “by Trenda With the coming of Spring > there are a lots of opportunities for celebrations. Whether you host > a Spring Luncheon, a Tea Party, a Cinco de Mayo Fiesta, a Kentucky > Derby Party, a Mother’s Day Brunch, a Graduation dinner, or wedding > buffet (whew!” >
LikeLiked by 1 person
Thank you, Sharon! Your comments always make my day.
I’m so glad you told me you were having trouble posting your comment. After reading that, I checked my account to see what was going on. Somehow, my post was delivered to my subscriber’s (like you!) but it did not post to my web site.
I’ve re-posted my blog and though my subscriber’s got a second copy, it did post to the web site this time. Thank you for letting me know. <3
LikeLike